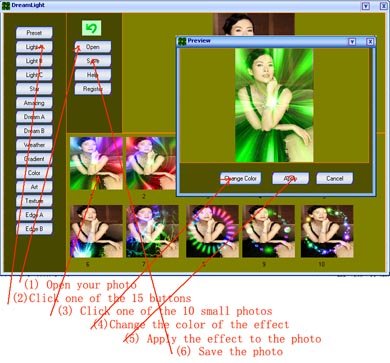
How to use DreamLight Photo Editor?
1) Open a photo
Click button 'Open' to open your photo.
2) Choose a filter
There are 15 buttons in the left of DreamLight Photo Editor's window.
Click one of the buttons to choose one filter.
For example, click button 'Light A', or click button 'Weather'.
3) Choose an effect
After you click one of the 15 buttons, 10 small photos show in the bottom of
DreamLight Photo Editor's window. Each small photo has its own special effect.
Click one of the small photos to choose the effect you like, then a new window
(Preview Window) will show.
4) Change the color of the effect.
You can change
the color of some effects. For example, click button 'Star' then click one of
the small photos, the Preview Window will show. And you'll find a button named
'Change Color' in the Preview Window. Just click this button then change the
color of the stars to red, green, yellow or any color you like.
( Note: Some effects' color can be changed, some others color can't be changed.
If you find button 'Change Color', it means the color can be changed, otherwise
the color can't be changed. )
5) Apply effect
Click button 'Apply' in the Preview Window to apply this effect.
6) Undo
If you don't like the effect after you apply it, you can click button 'Undo'.
6) Save
Click button 'Save' to save the dreamlight photo.
DreamLight Photo Editor has 15 kind of filters, totally 150 special effects for
you to choose.
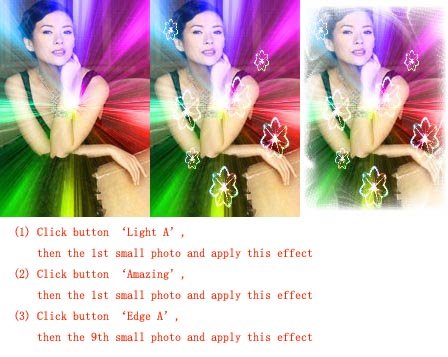
Besides using single effects, you can also use multi-effects on a photo (for
example, first use the Light effect, then use the Color effect, then use the
Star or Edge effect etc) to make you photo more attractive.
Example:


Original Photo Single Effect


Single Effect Multi Effect
(Change Color)
Sample A: Single Effect
Sample B: Multi Effects
Skills: Try to use different filter and effects to
see what DreamLight Photo Editor can create.
For example:
Button Color, effect 3-----Button Edge B, effect 3 ;
Button Star, effect 4-----Button Dream B, effect 1----Button Color, effect 9.
Here are some other samples:


![]()
![]()